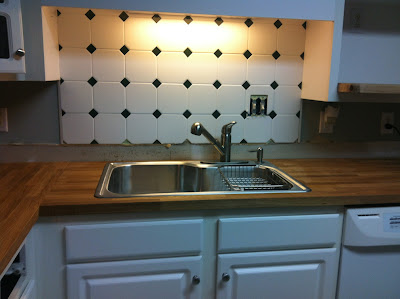
It's been a busy summer and fall around here. I've done a few smaller projects around the house but our kitchen has been our biggest undertaking so far. I've been anxiously awaiting the day I could get rid of our 1990's era, contractor grade, hunter green countertops and linoleum flooring.
Cue the angels singing.
I've got a lot of pictures and way too many details. It's been a while since I've blogged! Get ready for a long recap full of iPhone pictures. My DSLR camera had a run in with a can of hairspray and needs to visit a repairman.
We started with the flooring first. I researched all of the options and decided to go with the vinyl tiles. I had picked out a tile that I liked, but when I got to Lowe's I found the better quality, more expensive tiles on the CLEARANCE rack. It was like it was meant to be. So, instead of $2.25 per tile I ended up paying .47 per tile.
I may or may not have broke out the receipt in pure excitement while we were having dinner with friends later that evening. Pay no attention to awful phone pictures. :)
They were so easy to install. There are a million other tutorials that I used that could teach someone how to install them better than I could, but basically we stripped the finish off of the existing linoleum first to get the floor ready for the tiles.
Then we placed the tiles with spacers continuing across the entire floor to the edges. This is the peel and stick tiles so other than sticking to our fingers (it's super strong) it was fairly easy.
Once they were set it was time to grout. This really makes the tile look just like real stone tiles. I didn't spread it like you should but read on someones blog about how you "pipe" it into the lines just like icing then wipe with a sponge. It worked great!
Thankfully, I can skip ahead to phase 2 which actually didn't happen for a few more weeks. I changed all of the hardware on our cabinets and drawers. I went for the brushed nickel knobs and cup pulls. I bought 8 cup pulls and 25 knobs (I also switched out the ones in our bathroom) all for under $50 on eBay.
(Old white knobs)
(New knobs and cup pulls)
This was by far the easiest of all of the updates. I followed Katie Bower's suggestions for marking the new holes for the cup pulls. Again, these people know what they're doing. I'm just following along!
The next phase was a big one that needed schedules and travel plans coordinated. We decided to get the butcher block countertops from Ikea. I've seen them on a number of blogs and in magazines and decided they were right for us for so many reasons.
1- I just like the look. It's warm and neutral. I love granite but I don't think it goes with the look of our house.
2- It's sturdy and built to last. I'm not planning on using it to cut on, but you could.
3- It's a lot cheaper than most of the other options. Less than $700 for everything. Sold.
Here's the hard part - we don't live near Ikea. Luckily, I have a fabulous husband who agreed that our countertops could be our 1 year anniversary present to each other. This is my idea of romantic. And, since we headed to the mountains around our anniversary we made a pit stop in Charlotte on our way home. I've never been so excited. Whitney may have never been so bored. But, he was a good sport and we left with countertops, new drapes and a new stand for our TV. #Ikeaproblems
My dad graciously agreed to come help manage the new countertop installation. He use to build and install custom cabinetry so we had a professional on the team. I also followed the directions on Beneath My Heart (her kitchen was my inspiration).
We removed the old countertops and cut in the new ones. I didn't do a great job of taking pictures of that process. I was inside of the cabinets for the most part.
We also ended up getting a new sink in the process. I've been dying for a sink with a single, large basin instead of two. I found one at Home Depot that also included a faucet. It's not necessarily the one I would have chosen, but it matches and works great for right now. I didn't see a need in paying another $200 for a faucet when I had a perfectly good one in the box.
I'm so happy with how they look. But, I wasn't so happy about the mess it left along the backsplash. It was a perfect excuse to start phase 4 also known as "Kelly learns to tile".
Oh my goodness. I can not say enough about how glad I am that's over. It may be a little while before I try to tile something again. This was about the point when I questioned why I ever start these type of projects.
But I couldn't be happier with how it all turned out!
It's funny how this project starts with me outside one summer afternoon and ends with Christmas decorations in the background. That should tell you just how long I've been working at this. We've been working on this an hour or two at the time. And, while I don't like having to eat out for a solid month or washing dishes in the bathroom as I now sit at my new countertops and type this it was all worth it.
(Now if I could just get all new appliances!) :)


